EasyPoi官网
一、简单模版导出常用命令
- 空格分割
- 三目运算 {{test ? obj:obj2}}
- n: 表示 这个cell是数值类型 {{n:}}
- le: 代表长度{{le:()}} 在if/else 运用{{le:() > 8 ? obj1 : obj2}}
- fd: 格式化时间 {{fd:(obj;yyyy-MM-dd)}}
- fn: 格式化数字 {{fn:(obj;###.00)}}
- fe: 遍历数据,创建row
- !fe: 遍历数据不创建row
- $fe: 下移插入,把当前行,下面的行全部下移.size()行,然后插入
- #fe: 横向遍历
- v_fe: 横向遍历值
- !if: 删除当前列 {{!if:(test)}}
- 单引号表示常量值 ‘’ 比如’1’ 那么输出的就是 1
- &NULL& 空格
- &INDEX& 表示循环中的序号,自动添加
- ]] 换行符 多行遍历导出
- sum: 统计数据
- cal: 基础的+-X% 计算
- dict: 字典
- i18n: 国际化
常用命令
Excel循环
{{$fe:maplist t.province}} 二、最简单的导入
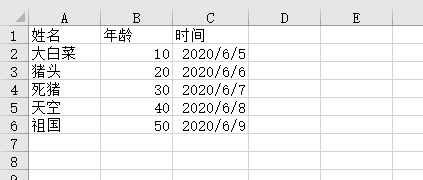
先看我们导入的Excel长什么样子
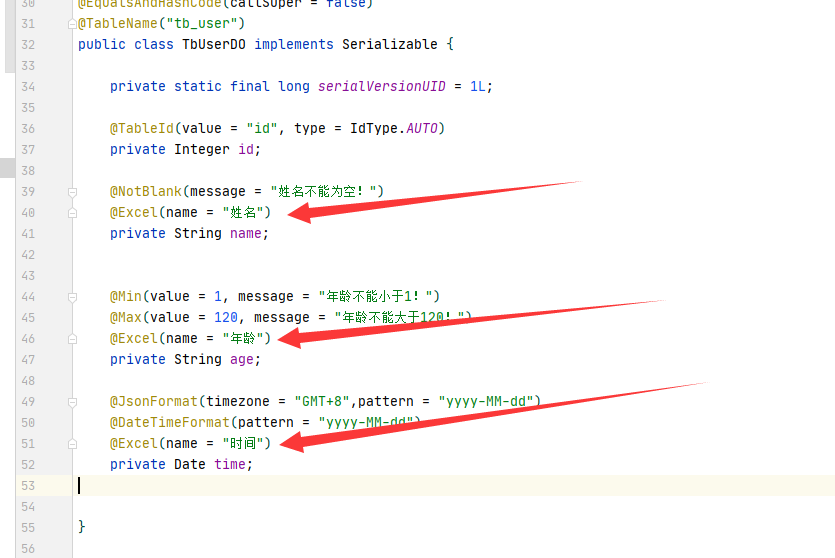
需要导入的字段加上相应的注解
上代码
    @PostMapping("testFile")
    public JsonData testFile(MultipartFile file) throws Exception {
        ImportParams importParams = new ImportParams();
        importParams.setStartRows(0);
        List<TbUserDO> tbUserDOS = ExcelImportUtil.importExcel(file.getInputStream(), TbUserDO.class, importParams);
        List<String> list = new ArrayList<>();
        tbUserDOS.forEach(obj -> {
            list.add(DateUtil.format(obj.getTime(), "yyyy/MM/dd"));
        });
        HashMap map = new HashMap();
        map.put("tbUserDOS",tbUserDOS);
        // 为了方便看导出时间是否准确
        map.put("time",list);
        return JsonData.buildSuccess(map);
    }
返回JSON
点击查看完整内容
{
    "code": 0,
    "data": {
        "tbUserDOS": [
            {
                "id": null,
                "name": "大白菜",
                "age": "10",
                "time": "2020-06-05"
            },
            {
                "id": null,
                "name": "猪头",
                "age": "20",
                "time": "2020-06-06"
            },
            {
                "id": null,
                "name": "死猪",
                "age": "30",
                "time": "2020-06-07"
            },
            {
                "id": null,
                "name": "天空",
                "age": "40",
                "time": "2020-06-08"
            },
            {
                "id": null,
                "name": "祖国",
                "age": "50",
                "time": "2020-06-09"
            }
        ],
        "time": [
            "2020/06/05",
            "2020/06/06",
            "2020/06/07",
            "2020/06/08",
            "2020/06/09"
        ]
    },
    "msg": "成功"
}
三、导入复杂表头操作
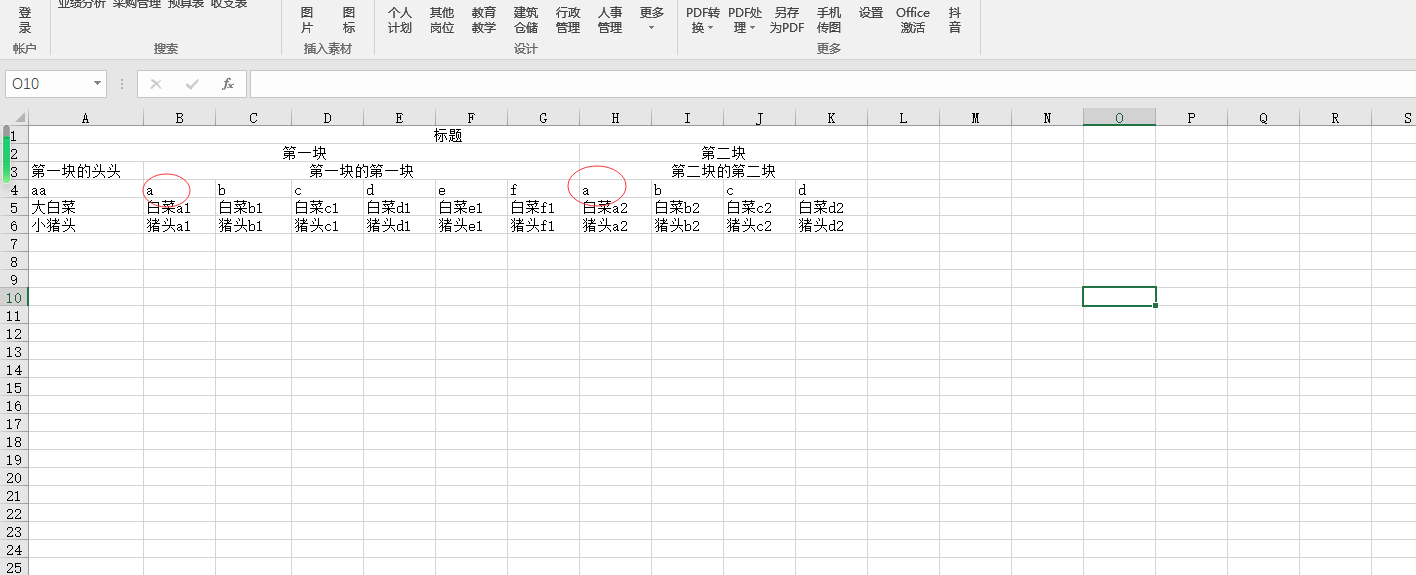
看看我们导入的是什么东西
实体类
package com.example.test05.demo.model;

import cn.afterturn.easypoi.excel.annotation.Excel;
import lombok.Data;

/**
 * @author DBC
 * @date 2022/8/1 15:40
 * @network dbc655.top
 */
@Data
public class TestImport {
    @Excel(name = "aa",fixedIndex = 0)
    private String a;

    @Excel(name = "a",fixedIndex = 1)
    private String b;

    @Excel(name = "b",fixedIndex = 2)
    private String c;

    @Excel(name = "c",fixedIndex = 3)
    private String d;

    @Excel(name = "d",fixedIndex = 4)
    private String e;

    @Excel(name = "e",fixedIndex = 5)
    private String f;

    @Excel(name = "f",fixedIndex = 6)
    private String g;

    @Excel(name = "a",fixedIndex = 7)
    private String h;

    @Excel(name = "b",fixedIndex = 8)
    private String i;

    @Excel(name = "c",fixedIndex = 9)
    private String j;

    @Excel(name = "d",fixedIndex = 10)
    private String k;

}
简单的控制层
点击查看完整内容
package com.example.test05.demo.controller;

import cn.afterturn.easypoi.excel.ExcelImportUtil;
import cn.afterturn.easypoi.excel.entity.ImportParams;
import cn.afterturn.easypoi.excel.entity.result.ExcelImportResult;
import cn.hutool.core.io.FileUtil;
import com.example.test05.demo.model.TestImport;
import com.example.test05.demo.tool.JsonData;
import lombok.extern.slf4j.Slf4j;
import org.springframework.web.bind.annotation.GetMapping;
import org.springframework.web.bind.annotation.RequestBody;
import org.springframework.web.bind.annotation.RequestMapping;
import org.springframework.web.bind.annotation.RestController;
import org.springframework.web.multipart.MultipartFile;

import javax.validation.constraints.NotNull;
import java.io.File;
import java.io.FileInputStream;
import java.io.FileNotFoundException;
import java.util.List;

/**
 * @author DBC
 * @date 2022/8/1 15:39
 * @network dbc655.top
 */
@RestController
@RequestMapping("/import")
@Slf4j
public class ImportController {

    /**
     * 默认地址
     */
    private static String importCachePath = "D:\\import\\";

    @GetMapping("importExcel")
    public JsonData importExcel(@RequestBody @NotNull MultipartFile multipartFile) throws Exception {
        log.info("现在准备导入");

        String fileName = "大法师";
        int lastIndexOf = multipartFile.getOriginalFilename().lastIndexOf(".");
        if (lastIndexOf >= 0) {
            fileName += multipartFile.getOriginalFilename().substring(lastIndexOf);
        }
        File file = new File(importCachePath + fileName);
        if (!file.getParentFile().exists()) {
            file.mkdirs();
        }

        ImportParams params = new ImportParams();

        params.setTitleRows(5);
        params.setTitleRows(3);
//            params.setConcurrentTask(true);

        ExcelImportResult<TestImport> importResult =
                ExcelImportUtil.importExcelMore(new FileInputStream(file), TestImport.class, params);

        List list = importResult.getList();


        log.info("现在导入的数据为:{}", list);


        return JsonData.buildSuccess(list);


    }
}
输出结果
{
    "code": 0,
    "data": [
        {
            "a": "大白菜",
            "b": "白菜a1",
            "c": "白菜b1",
            "d": "白菜c1",
            "e": "白菜d1",
            "f": "白菜e1",
            "g": "白菜f1",
            "h": "白菜a2",
            "i": "白菜b2",
            "j": "白菜c2",
            "k": "白菜d2"
        },
        {
            "a": "小猪头",
            "b": "猪头a1",
            "c": "猪头b1",
            "d": "猪头c1",
            "e": "猪头d1",
            "f": "猪头e1",
            "g": "猪头f1",
            "h": "猪头a2",
            "i": "猪头b2",
            "j": "猪头c2",
            "k": "猪头d2"
        }
    ],
    "msg": "成功"
} 四、横向遍历导出表
先看我们的Excel长什么样
具体代码
    @GetMapping
    public void test() throws IOException {
        String fileName =
                "大白菜横向统计表" + ".xlsx";
        String templateFileName = "template/横向遍历.xlsx";

        List<UserDO> userDOS = userService.list();

        Map<String, Object> templateMapList = new HashMap<>();
        templateMapList.put("mapList", userDOS);

        TemplateExportParams template = new TemplateExportParams(templateFileName);
        // 横向遍历
        template.setColForEach(true);

        Workbook workbook = ExcelExportUtil.exportExcel(template, templateMapList);
        File savefile = new File("D:/excel/");
        if (!savefile.exists()) {
            savefile.mkdirs();
        }
        FileOutputStream fos = new FileOutputStream("D:/excel/横向遍历.xlsx");
        workbook.write(fos);
        fos.close();

    }
导出效果如下
本文作者为DBC,转载请注明。


